×
India
GlobalThailandUAEUSAIndia
 Back
Back

Senior Analytics Consultant
Marketing | GMP
The Meta Conversions API (CAPI) enables privacy-compliant, server-side event tracking...
By Sumit Bhardwaj
Dec 23, 2025 | 5 Minutes | ![]() |
| ![]()
In the ever growing and changing digital landscape it is important for marketeers to consistently enhance their tracking methodologies and improve data signals to their marketing platforms.
With increasing focus on user privacy, the demand for using tracking methodologies like META’s (formerly Facebook) Conversion API which respects user privacy and at the same time can provide marketers the opportunity to improve their data signals soon will become a necessity.
So, ‘What is META CAPI’?
As per META, ‘The Meta Conversions API (CAPI) is a tool that allows businesses to send web interaction events directly from their servers to Facebook’s servers.’
It complements browser-based tracking methods of META popularly called as Facebook Pixels, by enabling businesses to track events in a more dependable and privacy-compliant manner. If so, then you must also be wondering, ‘Why META CAPI?’
Because it offers:
- Improved Data Accuracy: Since the data to META Ads platform is sent from the server, it is less likely to be affected by browser settings, ad blockers, or connectivity issues.
- Better Attribution: More reliable data helps Facebook’s algorithms better attribute conversions to the right ads, leading to improved optimization and ad performance.
- Enhanced Privacy Controls: Businesses can better control what data is shared with them, aligning with data privacy laws.
- Data Deduplication: When used alongside the Pixel, CAPI can help ensure that events are not counted twice.
With these understandings we are good enough to move forward and let us delve straight into ‘How Conversion API can be implemented?’ using Tag Management Solution like Google Tag Manager (GTM).
Pre-requisites:
1. Administrative access to Facebook Business Manager, the ad account, and the Pixel.
2. Access to both the web container and server-side GTM container.
3. Facebook Pixel installed active on the website via the web GTM container.
4. Ensure your server-side GTM container is configured and running (includes setting up a cloud server to host the server-side tagging environment).
Step 1: Create a Google Tag (Client Side GTM):
You need to first configure your web container to send your website data to your tagging server. Go to your client side GTM web container and select a ‘Google Tag’ template and add an ‘All Pages’ trigger to fire the tag every time a page loads.
Also, you need to add the following details as shown in the snapshot below:
1. Measurement ID: If you already have an existing GA4 Configuration set up, you can either amend it or create a new Configuration tag for Server-Side GTM.
Recommendation: We recommend you create a new Configuration Tag to avoid any unexpected hiccups in your already set up and working GA4 account. Once the configuration matures you can then eventually move your GA4 tracking to Server-Side as well.
An example of Google Tag created to send requests to tagging servers:

If you are setting up a fresh Google Tag, you can either set measurement ID of a newly set up property especially for receiving Server Hits or you can simply leave it empty as we need to receive this data via GA4 Client (discussed later) in Server container and forward it to META only for CAPI implementation.
2.Sending data to Server URL: Under the configuration parameters in Google Tag make sure to pass a parameter named ‘server_container_url’ with its value set to your tagging server URL.
3.Enabling User parameters tracking: Under the Event Parameter section You need to set ‘first_party_collection’ flag to ‘true’ to pass User Data parameters like email, phone number, etc. to the Server-Side GTM.
4.Sending Meta Browser ID and Click ID as event parameters:
| Parameter | Description |
|---|---|
Meta Click ID (_fbc) | (Google Tag Field Name: x-fb-ck-fbc)Identifies the link a user clicks to go to a site that uses first-party cookies. Advertisers can use this information to track which Facebook campaign links send users to their site, and when a user last visited. |
Meta Browser ID (_fbp) | (Google Tag Field Name: x-fb-ck-fbp)Tracks visits of a user across websites and reports the behaviour to META. _fbp cookie helps META to understand user behaviour across different platforms. |
- Create these parameters in your client-side GTM container, navigate to:
Variables > User Defined Variable > New > 1st Party Cookie > Add cookie name as _fbc > Save. Similarly, create another variable for ‘_fbp’ cookie.
1st Party Cookie variable type in GTM

Once both the 1st Party cookie variables are created, add them to the tag as shown in the Image (for keys of the parameter refer to the table above). META Click ID along with the Event ID is used by META for Deduplication (discussed later in the article).
Step 2: Setting up GA4 event Tag (Client Side GTM) to send META events to Tagging Server
Once the Google Tag is setup, we can also create ‘Google Analytics: GA4 Event’ tags to send events and related parameters to our Server URLs from where the Server-Side GTM can format and forward them to META Ads Platform.

You need to ensure that the event parameter names are as per the required format of META Ads Platform. Below are the keys for some suggested parameters that you can use to pass information to META:
| Conversions API Meta Parameter | GA4 Field Name |
|---|---|
Email (em) | user_data.email_address |
Click ID (fbc) | x-fb-ck-fbc |
Phone Number (phone_number) | user_data.phone_number |
Browser ID (fbp) | x-fb-ck-fbp |
First Name (first_name) | user_data.address.first_name |
Last Name (last_name) | user_data.address.last_name |
Deduplication of Events:
The ‘external_id’ and ‘fbp’ are alternative solutions for deduplication and help also to improve the quality of setup. ‘event_id’ is used to deduplicate same hits from the Pixel and Conversion API.
(Refer: www.developers.facebook.com/docs/marketing-api/conversions-api/deduplicate-pixel-and-server-events/)
META recommend that you use a redundant event setup and share the same events from both the Conversions API and your Meta Pixel. This help Meta to deduplicate events and reduce double reporting of identical events.
Step 3: Setting up GA4 Client in Server GTM Container.
A GTM Server container comes with a GA4 client by default. If you found a below client (Image 4) in container you can skip to step 4 else, you can create a GA4 web client in the server container as shown below.
A snapshot of Google Analytics 2 Web Client

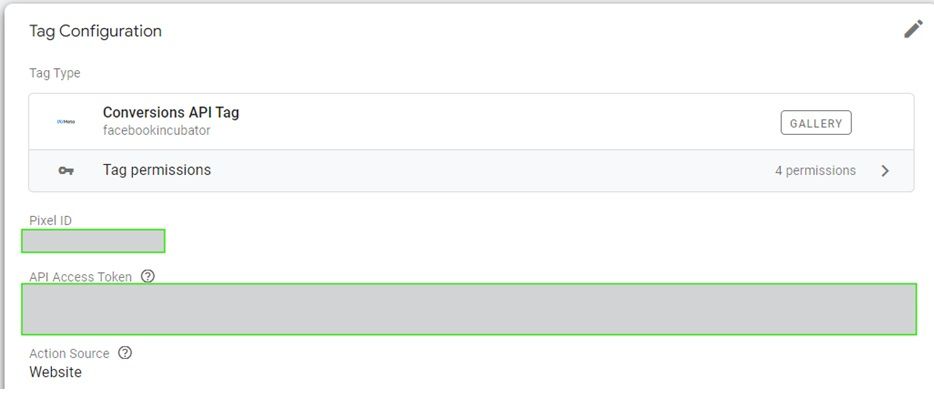
Step 4: Create META conversion API tag to send data to META Ads Platform (graph.facebook.com).
Finally, you need to create a Tag in the Server-Side GTM container to send data to META Ads Platform Servers. There are various tag templates available which you can import to your container and configure for the same. We’ll be importing and using a Tag Template by ‘facebookincubator’.
You will need to have a Pixel ID, an API Access Token (generated by META Platform) and specify the action source as ‘website’ along with the trigger to finalize the configuration.
Conversion API Tag by facebookincubator
 Step 5: Creating Trigger and Add conditions to it on Server Container Tag to fire it for specific Events.
You can simply Go to your Server Container and add a trigger to your CAPI Tag. Choose trigger type as ‘Custom’ along with the condition which says ‘Client Name’ contains ‘GA4’ to create a trigger that fires on all GA4 calls received by the Server Container.
Or, you can also add one more condition (say event name) like we have done in the image below to ensure that the tag fires only for the required events.
- Create a Look-Up variable in your Server Container.
- Take Input Variable as ‘Event Name’
- Enter name of events created to send to META in the Input and set ‘True’ as the output.
- Save the LookUp Variable by name of your choice. (say FB Events)
A snapshot of Lookup Container

Finally, you can add this variable to your trigger and your final Trigger Configuration would look like below.

With this you’ve now completed you entire META CAPI Setup and you’re ready to use the advantage of Server-Side Tagging. Before we wrap up, let me also add a 3-Step Validation Process in brief to test and validate the Setup.
3- Step Validation:
You need to preview both your Client Side and Server-Side Containers together to validate your implementation. Once both the containers are in preview mode, check for the following:
1.Ensure that the Google Tag and all the GA4 Event Tags in our Client Side GTM Container for which we are sending data to our Tagging Server URLs are firing in the Preview Mode along with the right set of parameter values.
2.You can also check for the Network Calls on your page. Right Click on the web-page open Inspect window. Go to ‘Network’ tab add your ‘Tagging Server URL’ in the filter and check for Network Calls with ‘Status 200’.
3.The above 2 steps ensure that everything is working correctly on the client-side and the calls are correctly forwarded to your Server URL. In the GTM Server container preview mode, you can also check whether these calls are forwarded to destination correctly or not.
In the image below, you can see the GTM Server container Preview mode, there are various sections like Summary, Tags, Variables, etc. which are similar to preview mode of the GTM Web Container with some new sections like Requests, Incoming HTTP Request, Outgoing HTTP requests from Server, etc which are specific to GTM Server Container.
A snapshot of Server Side GTM Preview Mode.
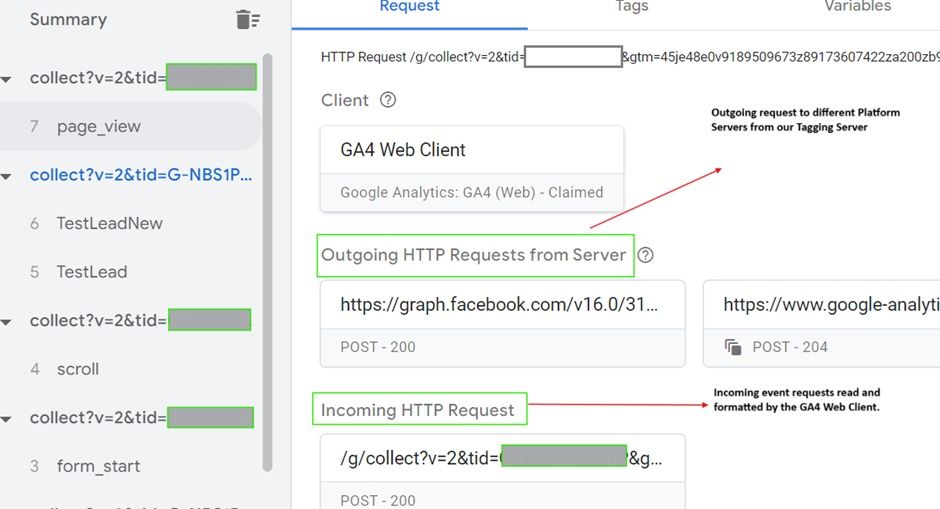 In the Preview mode, the Request tab in the UI contains:
• Client that claimed the request (in our case GA4 Web Client)
• Outgoing HTTP requests
• Incoming HTTP request
‘Incoming HTTP Request’ section can be used to see the incoming requests to Server URL. You can click the Incoming HTTP Request box to view details of the incoming request.
The ‘collect?v=’ request should be a match with what you see in the Chrome network tab. Make sure to confirm that the server container is receiving the right parameters as passed from the client Side and appears in the Chrome Browser Network Tab.
‘Outgoing HTTP Requests from Server’ shows details about the tag that generated the request, Outgoing request and HTTP response returned by the vendor endpoint. The outgoing request details show the data sent by the server container to the vendor endpoint.
> With this, we can conclude this Stepwise Guide. Feel free to explore more resources around GA4 concepts, methodology and implementation on our website’s blog section. Happy Server-Server Journey!!
>